Followers

Saturday 1 November 2014

Ladybug Crafts November challenge

Good morning (afternoon/evening/night - choose whichever is appropriate :) )
 
well November is here and I am frantically making Christmas cards and gifts for a craft fair in a couple of weeks - I sense a few late nights coming up!!
 
Anyway, it is that time again over at the Ladybug Crafts Challenge blog and this month the theme is;
 
Bright Colours :)
 
I have used on of the fabulous Sheena Douglass embossing folders by Crafter's Companion


Such a simple card as the embossing folder does all the work :)
I used the Neenah desert storm to emboss on and then used Spectrum Noir pencils to colour in one of the elephants.
I just love orange and pink together!!
 
I rubbed over the other embossed elephants with some Pebeo Empire gold gilding wax and then buffed them up to give them a glitzy shine.
 
I added a sentiment on a tag in gold embossing powder (from Sheena's A Taste of India stamp set) and tied it to a bright pink organza ribbon.
 
I did the inside of the card to match.
 
I hope you like my bright elephant :)
 
Don't forget to join in the bright colours challenge over on the challenge blog.
 
xxx


Sunday 19 October 2014

It's Birthday Week at Crafter's Companion and I'm celebrating too!!

Hello again :)
 
Well as it is birthday week over at Crafter's Companion UK 
I have a fab 'Celebration' Be Bunni stamp plate to give away to one lucky person :)


If you would like to win this little cutie all you need to do is leave a comment and I will draw a winner on Sunday 26th October :) *
 
Don't forget to check out all the fab birthday bargains at Crafter's Companion but be prepared to spend some money LOL  (I promise I won't overspend, I promise I won't overspend - do you think if I say it enough it will really happen LOL).
 
Don't forget to leave a comment below though for your chance to win my cute Be Bunni stamp :)
 
xxx


* Please check back to see if you have won as you will need to claim it by the 28th October.


Birthday Week at Crafter's Companion (and a couple of sneaky peeks :) )

 
Hello everyone :)
 
Well it's that time of year again - Birthday Week over at Crafter's Companion UK
so there are loads of offers to be had at fab prices too - don't forget to join the club, if you haven't already - to get an automatic 5% discount as a bronze member.  But then the more you spend, the more points you get and you could become a silver, gold or even a platinum member earning up to 20% off all purchases as well as free courier delivery  - I love it!!
 
So, as well as great offers there will be lots of new releases too so thought I would give you a little sneak peek at a couple :)
 
These use the new Create a Card 'Ornate Butterfly' die - so so pretty.  I also used a mix of Centura Pearl and Core'dinations card stock and lots of the quilling flower dies (I will list them all in later blog posts :) )


The following use another Create a Card die - this time 'Party Invitation'.  When I received this I was a bit dubious as I don't really have any parties and I don't go to any either and as I haven't got children I don't even go to any kid's parties either LOL.  So I wasn't sure I'd be able to come up with anything but I have to say I really enjoyed making with it as it let me pretend I was going to have a fab party that I could send out beautiful invitations for :)  I love the look for an adults party but with lots of bright colours and some pom poms it make s a fab childrens party invite too :)


I will be back over the week with more details about these projects.
 
If you fancy the chance of winning a Be Bunni Celebration stamp check out my next blog post.
 
xxx


Friday 3 October 2014

Heartfelt Creations wall ahnging

 
Hello all :)
So more Heartfelt Creations today, but this time a wall hanging.
 
The sunflowers in a pail are a stamp coloured with Aquamarkers and a blender pen on hot press watercolour paper.  The middles of the sunflowers have glossy accents on them.
 
The sunflowers are stamped and then cut out with th matching die - I love it as it cuts several out at once so you aren't there forever cutting out layer after layer :).
I also stamped and cut out some leaves.  The centre of these sunflowers are filled with mica flakes by Cosmic Shimmer - sparkle for grown ups LOL.
 
I covered a board with the sunflower paper, inked around the edges and then layered up my images.  The quote was actually in the paper pad as a thin border strip so I just cut it into the separate words and added this.  I added a wire piece as a hanger.
 
To finish off I took a couple of the ladybugs, that are on the stamp plate with the flowers and also in the die that cuts them out, and added them to the flowers.
 
This is really sweet and would look lovely in a farmhouse kitchen :)


xxx


Thursday 2 October 2014

Quilled flowers

 
Hi everyone, I'm here again :)
I thought today I would share a card that uses the beautiful Crafter's Companion quilled flower dies.
 
I used the Core'dinations Black Magic cardstock as a base layer and embossed it with a Sheena
embossing folder Sunflower Meadow.  I sanded it back to reveal the bright yellow underneath.
 
The sentiment is also  from Sheena's range and embossed in black powder so it's really glossy.
 
I used 2 of the quilling dies, the Sunflower large and Sunflower small.
I cut several out of Core'dinations card and wrapped them around.  I made a large flower using both sizes and a small one.
 
I added some small foliage pieces behind the flowers.  I also made a flower out of yellow felt - I liked this so much I added a brooch pin to the back so the recipient of the card can remove it from the card and add to a coat or a bag :)
 
To finish the card I added a big bow and did the inside of the card to match :)
 
Yellow isn't a colour that I use too often but I do love it and it is great with the black too -
what do you think?


xxx


Wednesday 1 October 2014

October Challenge at Ladybug Crafts

 
Hello all and welcome to Autumn :)
 
I love the Autumn, especially the beautiful colours that surround us.  I am very lucky to live in a fairly rural area so get to see lots of leaves turning from green to a fabulous range of oranges, yellows and browns :)
 
So, over at the Ladybug Crafts challenge blog this month, the challenge is Autumn and/or Halloween :)
Now I love Halloween, but sadly I don't really have anyone to send Halloween cards to so I have chosen to go with the Autumn theme.
 
I have used Heartfelt Creations papers and stamps to make this card.
 
I stamped in Vintage Sepia Versafine and then coloured the sunflower with Aquamarkers.
I didn't use any water at all (which is what I would usually do) but used the blender pen instead.  I used a hot pressed watercolour paper so it was nice and smooth. 
I layered up some of the papers from the matching pad and added the stamp which I had cut out with a slight margin.
The little stamp like piece with the sunflower on was coated with Glossy accents and a sprinkling of really fine glitter.
I added a big bow with a resin rose on top and also added 2 corduroy brads at the top.
I did the inside of the card to match.
Heartfelt Creations papers make it so easy to make a fab card fairly quickly and most of all I love these amazing Autumnal colours.


I hope you like my card today and I also hope you'll join in with our challenge this month.
 
xxx


Friday 12 September 2014

Good afternoon everyone :) 
I hope you are all well and having a fab crafty September.
I am trying to organise myself to make Christmas cards and gifts - I've got
so much to do and the time is just flying by!!
 
Anyway, I thought I would pop in and let you see a card I have made with some
 
I have made a bit of a shaped card by using a scalloped circle die to take off the top corner.
I have embossed some pink Core'dinations card with the Ornate Butterflies embossing folder.
I then sanded it back to see the core - I love this folder, especially as it's A4
so you can do some really big projects with it.
I then took the Decorative Heart folder and embossed some white card.  I used Pebeo gilding wax in Empire Gold to really make the pattern stand out.
I cut out one of the embossed butterflies from the left over pink card
and also embossed some vellum with the butterflies too and cut one out of this too.
I added gilding wax to the vellum piece and then stuck the vellum wings to the pink butterfly
and added some little pearls along the body.
I stuck this lovely little butterfly to the centre of the heart.
The sentiment is from the Sentimentals range - Vintage Floral - Greetings 
To finish I added
a fancy bow, a sparkly gem and a couple of stick pins.


I think this card is really floaty and feminine and I love it :)
I hope you do too
 
xxx


Tuesday 2 September 2014

My exciting news

 
Hello again (and so soon !!).
Well I did mention that I had some exciting news that I would like to share.
To be honest I have known for a little while now but to be honest I couldn't really believe it lol, so didn't say much just in case it wasn't real!!
 
I had a message on Facebook from a very nice lady who asked if I had a few moments for a chat.  For a horrible moment I wondered if I'd done something I shouldn't have done so I hesitantly said yes I was about and could have a few words.
Anyway, the nice lady was Sharon Callis from Crafter's Companion and she asked me if I would like to be a part of Crafter's Companion's Die'sire design team.  I asked her if she had the right person LOL!!!  So after the shock had abated a bit I said I would love to -
 
so I am now a design team member for Crafter's Companion Die'sire dies and Embossalicious embossing folders.
Excited isn't quite the right word, I'm ecstatic but a bit nervous too as the girls on the team are all super talented.  I am certainly going to do my very best to produce some great projects for them - and this is made easier by the fabulous dies and embossing folders that they bring to the market.
So I thought I had better share a crafty make with you using said folders :)
 
For the first one, I have kept it simple;


This is Kraft card embossed using the 8 x 8 folder Elegance.
I wrapped some lace across the front and made a lace flower.  The sentiment is from the Sentimentals range - Sentiments heat embossed with WOW powder and cut out with the Scalloped Tag .
I made the inside up to match and added a blank scalloped tag as a place to write a message :)
 
Well I will be back with lots more from Crafter's Companion very soon.
 
xxx


Monday 1 September 2014

Ladybug crafts September challenge :)

Hello everyone :)
 
Running late as ever lol - I really can't believe it's September already!
I have lots of Christmas cards to get making, plus lots of gifts etc as I am hoping to get a craft stall somewhere a little nearer the time (I would like a regular stall somewhere but just can't find the right spot at the moment).
Also I have some exciting news, but I shall blog about that separately after this!
 
However, as it's the start of the month that means that it is challenge time over at the Ladybug Crafts challenge blog.  this month it's ..
 
Anything Goes
 
it was going to be something totally different but I mixed everything up with the months, so
 Anything Goes it is :)
 
I have done something a little different for me - I had a fab Whimsy stamp I have never inked up but I also had some age old papers which I loved the colour of and didn't know what to use them for, so I thought I would see if I could put them together even though I wouldn't normally.
I love the image but I'm not sure about the card, but my hubby thinks it's fab albeit different :)
 
So what do you think...


I coloured the lion with Spectrum Noir pens and pencils.  As I said the paper is some I've had for ages so I have no idea who it's by.  I stitched around the mats just because I fancied it :)  The sentiment is by Crafter's Companion from their Sentimentals range - 'Greetings'.
I just love that lion - well being a Leo I have to don't I!
 
Anyway, as I said it is something a little different but I kind of like it :)
Right back soon with my exciting news
 
xxx
 
(Oh, don't forget to join in the challenge :) )
xx


Friday 1 August 2014

Hello August :)

Morning all :)
Well here is August already - I am another year older (my birthday was yesterday the 31st) again lol!
 
It is a bit cooler now than it has been which is quite nice really, especially for our older dog Oscar, who has been really suffering in the heat.  I have had shingles, but I am on the mend now, but the hot and sticky weather has made that more uncomfortable too.  However, it has been nice to have a proper Summer as opposed to the wet weather we have had for the last few years :)
 
Anyway, as it is August it is time for a new challenge on the Ladybug Crafts challenge  blog.  This month the theme is ;
Favourite Colours
 
so a nice easy one really - although I have lots of favourite colours, which change on a regular basis!!
 
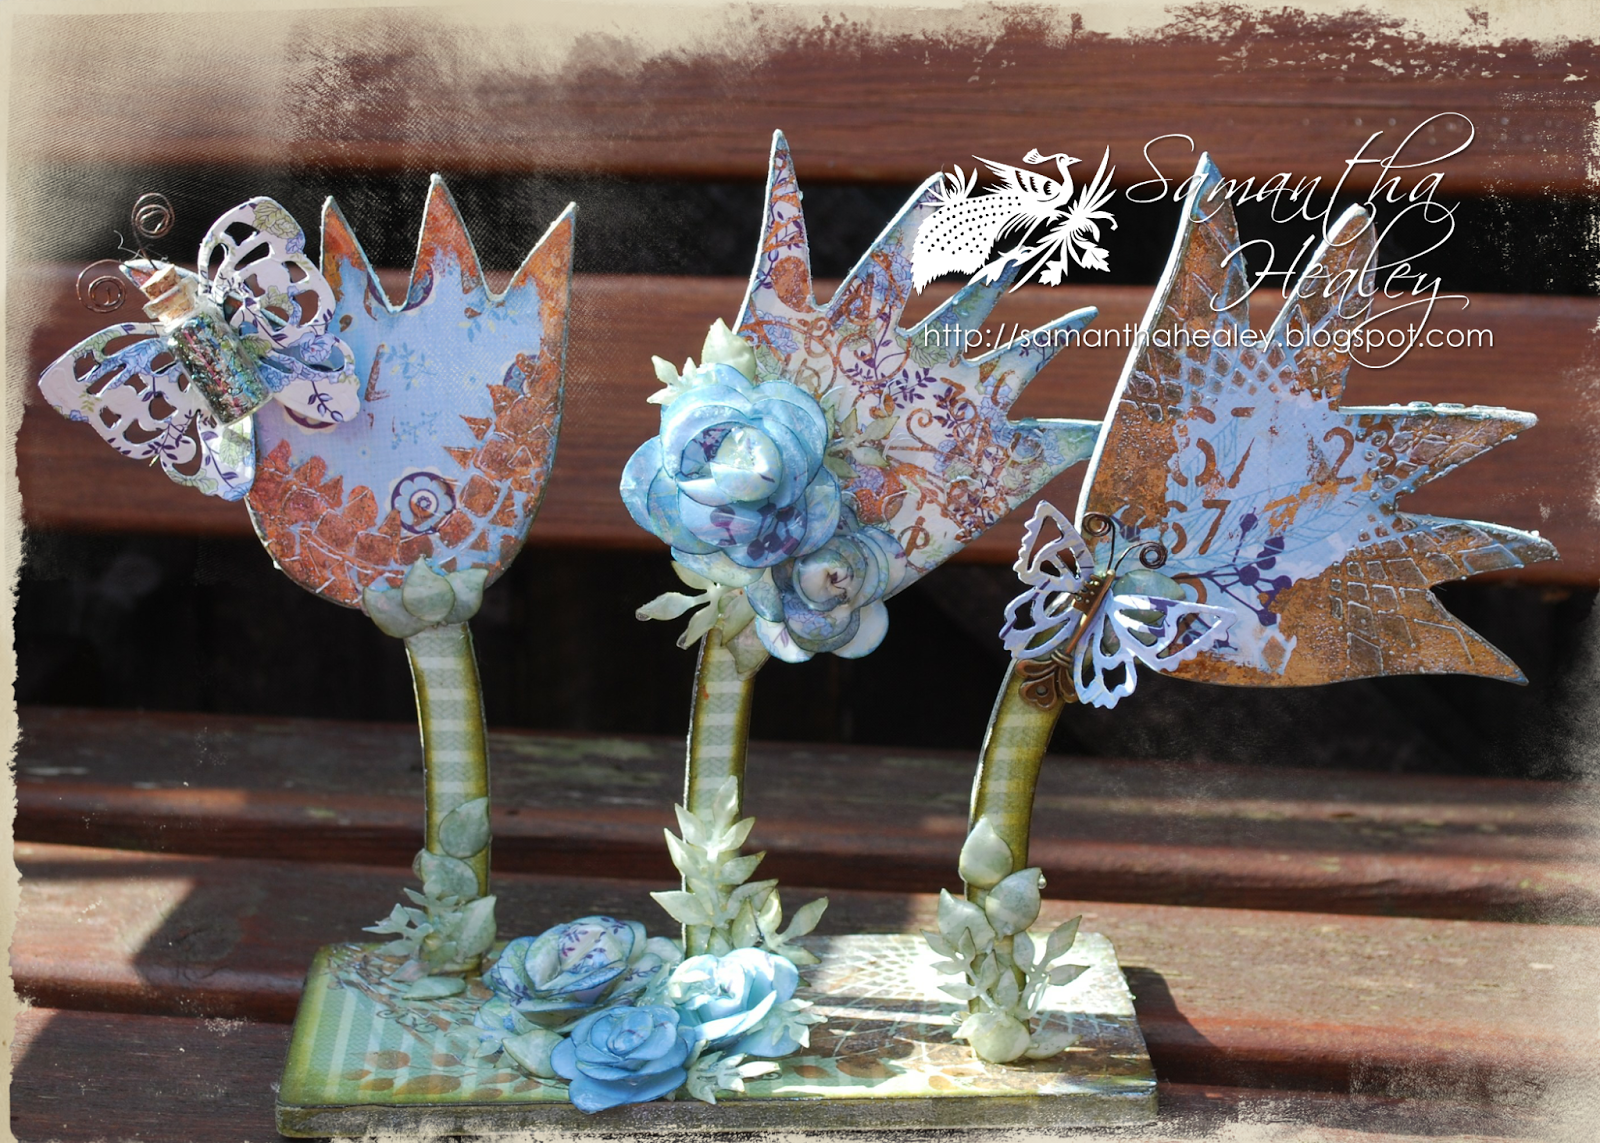
So, I have gone with a mixed media piece this time, in the shape of 3 tulips, which started out as plain MDF.


I gessoed the tulips and then covered them in decorative paper using gel medium to stick it down.  I inked all of the edges in walnut stain distress ink.  I did some stamping, using an alpha stamp and a numerals stamp - just over the flowers, not the stems (I really wanted to keep the green colour here), I used an archival ink here as I knew that I was going to coat with gel medium and I didn't want the ink to run.
I then took some stencils and first of all I stencilled flitter glue through and then added gilding flake. On top of that I stencilled some texture paste on too - I love that layering look.  When I finished I coated it all with some more matt gel medium to seal it all.
 
I made some paper roses with the same papers I covered the tulips with and then I dunked them into UTEE in my melt pot for the faux porcelain look.  I put them on one side to dry off and did the same with some punched leaves.
I stuck some patterned paper onto some Studio 490 moldable plastic (the proper name escapes me right now!) and then die cut some butterflies - as this is so thick the dies didn't cut right through so I had to fiddle a bit with a craft knife to finish cutting them - which I then heated and shaped.  I love the way that you can mold the plastic and it holds its shape perfectly.  I added a metal key to the body of one butterfly and to the other I added a little corked vial which I had filled with metal flake.  I made some antennae out of some wire and added these too.
 
I stuck on the flowers and the butterflies to finish this little home décor piece - I love it.  I am just loving green right now and I think these tulips are really cute :)
 
Don't forget to join in with the favourite colour challenge this month.
Back soon
 
xxx